
How to create a page: Difference between revisions
Improve steps |
Improve format |
||
| Line 2: | Line 2: | ||
== 1) Search for the article name == | == 1) Search for the article name == | ||
[[File:Page1.jpg| | [[File:Page1.jpg|none|thumb|600x600px]] | ||
==2) Click on the article name, in red, to start creating it== | ==2) Click on the article name, in red, to start creating it== | ||
[[File:Page2.jpg| | [[File:Page2.jpg|none|thumb|600x600px]] | ||
==3) Choose a category. The main options are: '''<big>[[:Category:Groups|Groups]]</big>''', '''<big>[[:Category:Event|Event]]</big>''', '''<big>[[:Category:Entity|Entity]]</big>''', '''<big>[[:Category:Location|Location]]</big>''', '''<big>[[:Category:Ritual|Ritual]]</big>''', '''<big>[[:Category:General|General]]</big>''', '''<big>[[:Category:Technical|Technical]]</big>''' and '''<big>[[:Category:External|External]]</big>'''== | ==3) Choose a category. The main options are: '''<big>[[:Category:Groups|Groups]]</big>''', '''<big>[[:Category:Event|Event]]</big>''', '''<big>[[:Category:Entity|Entity]]</big>''', '''<big>[[:Category:Location|Location]]</big>''', '''<big>[[:Category:Ritual|Ritual]]</big>''', '''<big>[[:Category:General|General]]</big>''', '''<big>[[:Category:Technical|Technical]]</big>''' and '''<big>[[:Category:External|External]]</big>'''== | ||
<gallery> | |||
File:Page4.jpg|1 - Select the Categories option. | |||
You'll see it on the bottom of the page | File:Category print.png|2 - Type the category name and select it. | ||
File:Category print 2.png|3 - You'll see it on the bottom of the page. | |||
</gallery> | |||
==4) Choose a template, <u>if needed</u>. The main options are: '''<big>[[:Template:Event|Event]]</big>''', '''<big>[[:Template:Entity|Entity]]</big>''' and '''<big>[[:Template:Location|Location]]</big>'''== | ==4) Choose a template, <u>if needed</u>. The main options are: '''<big>[[:Template:Event|Event]]</big>''', '''<big>[[:Template:Entity|Entity]]</big>''' and '''<big>[[:Template:Location|Location]]</big>'''== | ||
<gallery> | |||
File:Page9.jpg|1 - Select the Template option. | |||
You'll see it added to the page | File:Template screenshot.png|2 - Fill the template detais. | ||
File:Template screenshot 2.png|3 - You'll see it added to the page. | |||
</gallery> | |||
== 5) Fill the article. Here's a [[Mingebags|nicely formatted one]]:== | == 5) Fill the article. Here's a [[Mingebags|nicely formatted one]]:== | ||
Revision as of 05:00, 25 February 2023
This can be easily done in 5 steps (to get good).
1) Search for the article name

2) Click on the article name, in red, to start creating it

3) Choose a category. The main options are: Groups, Event, Entity, Location, Ritual, General, Technical and External
-
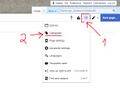 1 - Select the Categories option.
 -
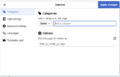 2 - Type the category name and select it.
 -
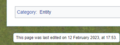 3 - You'll see it on the bottom of the page.


4) Choose a template, if needed. The main options are: Event, Entity and Location
-
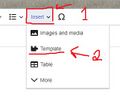 1 - Select the Template option.
 -
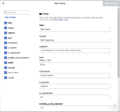 2 - Fill the template detais.
 -
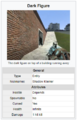 3 - You'll see it added to the page.


5) Fill the article. Here's a nicely formatted one:

6) Extra:
To add a YouTube video, change the editor to "Source Editing" in the pencil icon, copy these tags below to your article and put the video link id between them:
<youtube>nP2gi3GCVbo</youtube>
Result: